Okta Workflows makes it easy to automate identity processes at scale – without writing code. Using the if-this-then-that logic, Okta’s pre-built connector library and the ability to connect to any publicly available API, anyone can innovate with Okta. Okta’s Workflows Connector Builder is a no-code development tool for creating connectors on the Workflows platform. It leverages the same Workflows functionality used by Okta customers to turn their use cases into automated pre-canned flows. Flogrammers (Workflow Programmers) can use Connector Builder to package their flows with authentication and branding to be used by customers in their own tenants, or submitted to the Okta Integration Network for inclusion in the public catalog for use by all Okta customers on the Workflows platform. For additional information on Okta Workflows, see the documentation here and for additional information on Connector Builder, see the documentation here.
This tutorial provides a walk though of how to use the Okta Workflows Connector Builder.
Sample Use Case
Okta provides a number of Workflow Connectors in the public facing catalogue. The list of available connectors can be found here. The Slack connector provides a number of actions that can be used to interact with your Slack workspace. On occasions, you may need to interact with Slack in a more user interactive way via modals. Modals are the Slack app equivalent of alert boxes, pop-ups, or dialog boxes. They capture and maintain focus within Slack until the user submits or dismisses the modal. Because modals require a Slack app definition, they fall outside of what the current Workflow connector provides. In this tutorial, we will create a custom connector that can be used to interact with Slack modals. For further information on Slack modals and creating a Slack application, see the Slack documentation here.
Note: This tutorial does not include detail on creating Slack applications or modals. It is expected that the developer has a prior understanding of developing against Slack.
High Level Steps
At a high level, the basic steps involved in creating a connector are the following:
- Create your connector project
- Configure required authentication
- Create connector flows
- Deploy your connector
Note: This tutorial is provided as a high level example only and it should only be used in conjunction with the Connector Builder documentation here.
Step 1 – Create Connector Project
Once you have the Connector Builder enabled in your workflow instance, there will be a button labeled Connector Builder at the top of the workflow console. Click the button to open the Connector Builder.
In the left pane, create a connector and give it a meaningful name. In this example, I have called my connector Slack Modal. Once created, the basic framework of the connector will be provided. The first section that needs to be updated is Settings on the Overview tab. This is where you will need to provide a description, icon, card color, documentation link and support email.
Here are the settings I used in my connector:

Step 2 – Set Up Authentication
To set up the required authentication for the connector, click the Set up authentication button at the bottom of the overview tab:
Then select the authentication type (Basic, Auth 2.0 or Custom). See the documentation here for a detailed explanation.
To authenticate with my Slack app, I’m using a Slack Bot User OAuth Token, so I have chosen Custom as the authentication type. I have then added a single parameter used to capture the Slack token when the connector is initialized within the workflows instance.
This is what my authentication configuration looks like:

Step 3 – Create Connector Flows
In this step, we are now ready to add the required logic to the connector. Under the connectors Flows tab, we can add the following flow types:
| Flow Type | Description |
|---|---|
| Helper Flow | This flow manages two things for each action card that you’ll build in Connector Builder: authentication and any HTTP request. This is implemented in support of the Don’t Repeat Yourself (DRY) principle of software development aimed at reducing repetition of software patterns. |
| Action Flow | A Custom API Action (CAPIA) is an action card available on a connector that allows the end user to make an authenticated HTTP request to the service in question. The base url is hard coded into the connector, so users only need to add the relative url for the endpoint. They then manually create the required objects for header, query, and/or request body if necessary. The CAPIA then returns data from the service as three outputs: Status Code, Headers, and Body. |
| Authping Flow | This is a system flow that allows the platform to “ping” an API and check for valid authorization. This acts as a sort of health check that runs when the connector is first authenticated, new connectors are added, or flows are opened. The flow must be named _authping in order to be recognized by the platform. Authping flows are not displayed to the end user and are only used by the platform. It has no options or input fields. |
| Revoke Flow | This is a system flow that allows a builder the ability to revoke an OAuth 2.0 (or other token based auth) token. A connector’s _revoke method is invoked when a connection is deleted from the platform or when a user requests their data be deleted (for example, for compliance with General Data Protection Regulation). Revoke flows are not displayed to the end user and are only used by the platform. The revoke flow has no Options or Input fields. |
In my example, I created four flows; a _authping flow, a helper flow and two action flows:

My _authping flow takes the passed Slack token and calls the Slack auth.test endpoint. The Slack API documentation can be found here.
I added a helper flow to format the Authorization header which is called by the two action flows. My helper flow is displayed below:

When building your action flows, you will need to define the required inputs and outputs. See the documentation here. During this process, the Connector Builder will preview the card as it will appear when used in a flow. See my example below:

Step 4 – Test Your Flows
All connector flows can be tested like any other flow. The difference in Connector Builder is that you need to simulate a pre-configured connection. This can be done by creating a temporary connection for each test, or creating a permanent test connection that can be re-used for subsequent tests. A permanent test connection can be created at the time each flow is tested as per the image below:

or via the Test Connections tab in the Connector Builder. For further information, see the documentation here.
Step 5 – Deploy Your Connector
Once you are happy with each flow, you can now deploy your connector via the deployment tab. You will be presented with the following options:

The deployment tab provides three options:
- Validate connector – You can test the connector was built error-free and contains the necessary components for a successful deployment.
- Deploy test version – You can choose to compile and deploy a connector to your Workflows tenant to test it using actual flows. The name of the connector will be prefixed by
(Test)so it can be distinguished as a test connector for any production connectors in the tenant. Use this option when you need to test a connector that is already in production and whose flows you’ve since modified. - Deploy local connector – You can compile and deploy a connector to your local environment where it can be used for further testing for production purposes. Perform a local deployment when the connector is working and is ready for production. The locally deployed connector will only be available in your tenant.
Start by validating your connector. If validation is successful, then you can deploy either a test version or a local connector. If the connector is deployed as a test version, your connector won’t appear in the standard list of available connectors. You can access it by ticking the check box Include Test Connectors, when adding a connector to a flow.
Here is an extract from my connector list that includes my custom connector, Slack Modal:

Using Your Connector
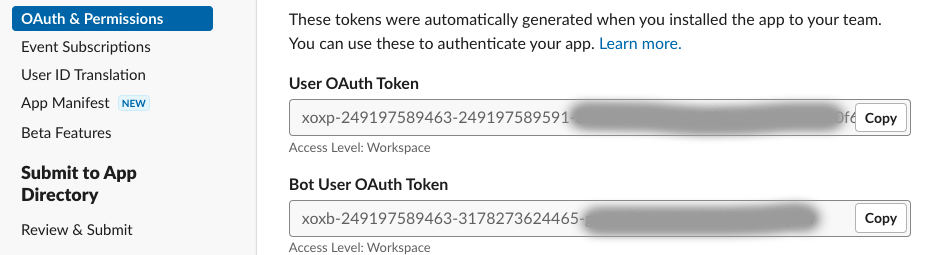
Now that I have built and deployed my connector, it can be used in an actual flow. The first thing I need to do is add my new connector to my list of authorized connectors. To do this, I need to copy the Bot User OAuth Token from my Slack app as displayed below:
At a high level, here is the interaction between Slack and Okta:

My interactivity flow is exposed as an external API endpoint. (See below) The respective endpoint is then configured within my Slack application. Note that it calls my helper flow asynchronously as we need to reply to Slack before its invoke of Okta Workflows times out.

The URL of my interactivity flow above, is then configured within my Slack application as displayed below:

My interactivity flow calls my helper flow. (displayed below) As you can see, the helper flow is using the two defined actions from my Slack Modal connector. Based on the passed user Id, the flow retrieves the users Slack profile via Get Slack User. The flow then takes the users “real name” and uses it within the composition of the Slack modal. Finally, the flow calls the Open Modal operation, passing the formatted modal payload.

And here is the resulting Slack modal:

Just in case you might like to try Slack Modals, here is my formatted modal payload:
{
    "trigger_id": "<trigger_id>",
    "view": {
        "type": "modal",
        "private_metadata": "",
        "close": {
            "type": "plain_text",
            "text": "Close",
            "emoji": true
        },
        "title": {
            "type": "plain_text",
            "text": "Okta Connector Builder",
            "emoji": true
        },
        "blocks": [
            {
                "type": "section",
                "text": {
                    "type": "mrkdwn",
                    "text": "*Hello <users_name>* \n\n *Welcome to Slack Modals ...*"
                },
                "accessory": {
                    "type": "image",
                    "image_url": "https://avatars.githubusercontent.com/u/13510430?s=280&v=4",
                    "alt_text": "Okta Connector Builder"
                }
            },
            {
                "type": "divider"
            },
            {
                "type": "section",
                "text": {
                    "type": "mrkdwn",
                    "text": "*This is an example of how to build your own connector with Okta's Workflow Connector Builder*"
                }
            }
        ]
    }
} IAMSE
IAMSE
3 thoughts on “Okta Workflows Connector Builder”